A step-by-step guide
It’s the day before my fast API live stream. I decided to create a guide for the stream and turn it into a blog post. So, here it is.
Stream structure:
- Fast API vs Django
- Installation
- Create First APP & Route
- Swagger UI
- Path Parameters
- POST, PUT & DELETE Requests
- Database & Models
- CRUD with new database
Fast API vs. Django
A lot of you may know me as the Django guy. After all, my channel is littered with Django projects and courses. This last week I took a trip to Lake Shasta which is in northern California, and like always, I got bored with having too much free time on my hands so I decided to learn something new.
I’ve been asked over and over what my opinion was on the new framework and how it compares to Django, and up until now, I kept quiet because, well, I didn't know much about it.
After a week, I still don't know much about it, but I have learned how to create a simple CRUD app and have started forming my opinion. To be honest this opinion is not locked in and is subject to change as I work with fast API more and more.
Here’s my conclusion as of 5/22/2022. Django is still the more powerful framework and will be my go-to. Fast API is pretty cool though. One area where fast API really stood out for me was the support for ASYNC and not having to constantly serialize my data. Honestly, I hate having to serialize data just to render out a simple object or list.
Fast API was fast and easy to set up but you end up paying for it later. This is why I don't like lightweight frameworks like Flask and Fast API typically. Django gives me an easy-to-configure database, ORM, Authentication and so much more.
OK, enough with my opinions. Let's get started with the guide.
Installation
I should probably already assume this, but if you don't already, make sure you have Python installed on your machine. Fast API requires Python 3.6 and up.
Once you have Python installed, Fast API can be installed with a simple pip command
pip install fastapi
Create First APP and Route
Let’s start by creating a simple app and route that returns back a list of items as JSON data.
To create your first project, simply create a new folder somewhere on your computer. I’m adding this to my desktop and calling it myapi.
Open this folder with the text editor of your choice (VS Code for me) and create a file called main.py. This will be the main file that ties our app together.
myapi
   main.py
Inside of the main.py file, start by importing the FastAPI class, setting up the app variable, and creating your first route. Here’s the code to do that:
#main.py
from fastapi import FastAPI
app = FastAPI()
@app.get("/")
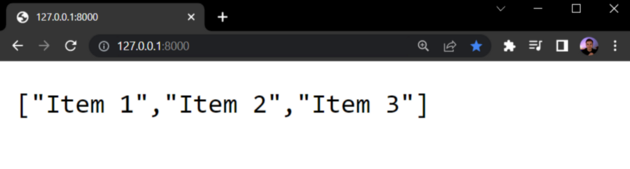
def getItems():
return ['Item 1', 'Item 2', 'Item 3']
Now, to see this output, let's install uvicorn which is an ASGI server.
pip install uvicorn
Now to run the server make sure you are in the projects root directory and run the following command:
uvicorn main:app --reload

#Output
INFO:     Uvicorn running on http://127.0.0.1:8000 (Press CTRL+C to quit)
INFO:     Started reloader process [28720]
INFO:     Started server process [28722]
INFO:     Waiting for application startup.
INFO:     Application startup complete.
main is the file name, app is the name of our app variable and — reload will restart our server anytime we make a change to the code and should only be used in development.
Swagger UI
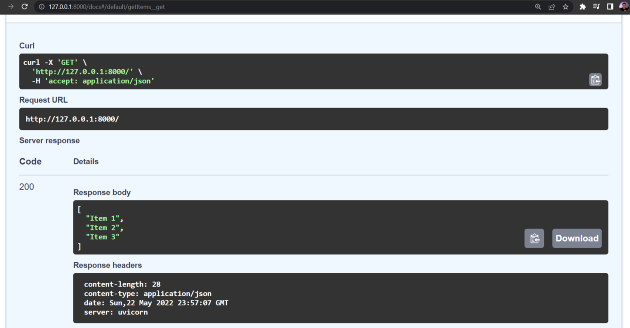
Fast API provides an interactive API that’s brought to us by swagger UI. I’ll save myself from explaining swagger UI and instead will provide a link if you want to check it out, but trust me, it’s pretty cool.
To see it in action, add /docs# to the end of the URL we set for our first route.
http://127.0.0.1:8000/docs#
This will give you a cool UI to work with so you can interact with your API and get more information than just some data. This will list out all your routes as you add them.
To test things out, click on the route that is currently available and then click “try it out” and then “execute.”
Now, you will see your data formatted like so:
Before moving on to the next section let’s create an object that will represent our database. We will eventually start working with an SQLite database but this will make things easier to start with before we advance later.
Create this object just above our first route:
fakeDatabase = {
    1:{'task':'Clean car'},
    2:{'task':'Write blog'},
    3:{'task':'Start stream'},
}
and render the items out in the first route:
@app.get("/")
def getItems():
    return fakeDatabase
Path Parameters
Next, I want to create some dynamic routes to retrieve a particular object from my database. To do this we will create a new route with a path parameter and then specify the type of parameter we need in our view function.
This is actually very simple using the following code:
@app.get("/{id}")
def getItem(id:int):
    return fakeDatabase[id]
This route will expect an integer as a path parameter for the id value. We will then take that parameter and query the item that has that particular id. When testing, make sure you are using ids that exist in your database.
The output will look like this when you visit 127:0.0.1:8000/3
{"task""start stream"}
POST, PUT and DELETE Requests
Time to send some POST, PUT, and DELETE requests so we can modify our fake database.
Just to recap, a POST request is for adding data, a PUT request is typically for Updating data and a DELETE request is for, well, deleting data.
Starting with our POST request for adding new items to our database, we have a few ways of doing this so I’ll test out three options.
Here is the route we need to create. I’ll break it down below.
#Option # 1
@app.post("/")
def addItem(task:str):
    newId = len(fakeDatabase.keys()) + 1
    fakeDatabase[newId] = {"task":task}
    return fakeDatabase
What you will see in the docs UI is the following:
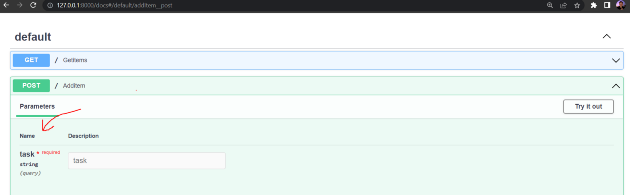
app.post — We are specifying the HTTP request type for this route as a post request.
/ — This is the same route as getItems. addItems will handle all post requests sent here while getItems will handle all get requests.
Function parameters — In the function we specify that we are expecting a task in the request body and the data type must be a string.
When we explicitly specify the parameters needed this will be reflected in the docs UI as a form field as the image above shows. Pretty neat, huh?
Now, let's say we need to send multiple values in the request body. We can add each field as a parameter to the function but this can get pretty messy.
Just imagine something like this:
addItem(“task”:str, “priority”:”str”, “rank”:int, ..........)
This can go on forever and get messy!
So instead, we will use pydantic to design our data scheme and simply pass in an object that will specify the data needed. This will make things much cleaner.
To do this, we will first install pydantic, then create a new file called schemas.py and add the following code:
pip install pydantic
Create schemas.py file
myapi
   main.py
   schemas.py
schemas.py
from pydantic import BaseModel
class Item(BaseModel):
    task: str
We will then import our schema into our main.py file and update our addItem route to look like so.
from fastapi import FastAPI
import schemas
…………
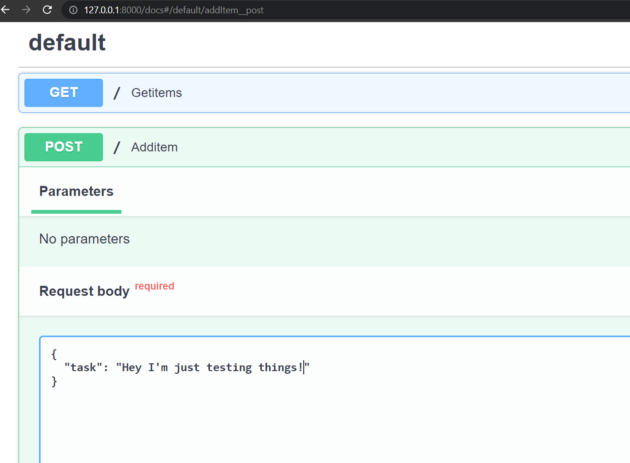
#Option # 2
@app.post("/")
def addItem(item:schemas.Item):
newId = len(fakeDatabase.keys()) + 1
fakeDatabase[newId] = {"task":item.task}
return fakeDatabase
Your doc’s UI should look something like this:
OK, so options 1 and 2 work great but some of you may not know what data you want to send over right away, or maybe you just want to access the entire request body sent over and extract each item as you please. I’ll show you how to do this as option 3.
Again, we will modify the addItem route, but this time we need to import Body from Fast API in main.py
from fastapi import FastAPI, Body
Next, we will use the Body class and add it as a parameter in our route. Once we add it as a parameter, we can then access the request body as a dictionary and extract the value of the task.
#Option #3
@app.post("/")
def addItem(body = Body()):
   newId = len(fakeDatabase.keys()) + 1
   fakeDatabase[newId] = {"task":body['task']}
   return fakeDatabase
And that’s it!
The downside to this approach is that you won’t have your fields specified in the docs UI. All you will see is a string value so you will have to create the entire request body yourself. Honestly, it’s not much of an issue since you typically have to create the request body in the front end anyways but it’s something to consider. Also, make sure that you are using double quotes and not single quotes. This will ensure that the string is able to be parsed on the receiving end.
Updating Data
In main.py, let's add the following route for updating data:
@app.put("/{id}")
def updateItem(id:int, item:schemas.Item):
    fakeDatabase[id]['task'] = item.task
    return fakeDatabase
We are using the same URL path as getItem, but this route will specifically handle the put request. You can use one of the three options we used for the post request. In my example, I decided to go with the pydantic route (option 2).
Deleting Data
Let’s add one more route, this one will process delete requests sent to /{id}. The only parameter we need is the id since all we are doing is finding the item we need and removing it from the database.
@app.delete("/{id}")
def deleteItem(id:int):
    del fakeDatabase[id]
    return fakeDatabase
Database and Models
All right, so we’re done with our placeholder database. It’s time to make a real connection and build out our models file. In this example, we will use SQLite as our DB.
pip install sqlalchemy
We’ll start by adding a database.py file to establish a connection and then add the following code inside of the new file.
myapi
   main.py
   schemas.py
   database.py
database.py
from sqlalchemy import create_engine
from sqlalchemy.ext.declarative import declarative_base
from sqlalchemy.orm import sessionmaker

#Create sqlite engine instance
engine = create_engine("sqlite:///todo.db")

#Create declaritive base meta instance
Base = declarative_base()

#Create session local class for session maker
SessionLocal = sessionmaker(bind=engine, expire_on_commit=False)
Once we have our database connection configured, we’ll want to create our database models to represent our db tables.
myapi
   main.py
   schemas.py
   database.py
   models.py
models.py
from sqlalchemy import Column, Integer, String
from database import Base
class Item(Base):
    __tablename__ = 'items'
    id = Column(Integer, primary_key=True)
    task = Column(String(256))
Now, let's initiate our database in main.pyso we can start using it.
Working with our database
OK, let's make our first database query.
Let's update our getItems view to query all the items in our database like so:
@app.get("/")
def getItems(session: Session = Depends(get_session)):
    items = session.query(models.Item).all()
    return items
This will return back all the items as a JSON list. At this point, we don’t have any items, so let's change that by updating our addItem view.
@app.post("/")
def addItem(item:schemas.Item, session = Depends(get_session)):
    item = models.Item(task = item.task)
    session.add(item)
    session.commit()
    session.refresh(item)
    return item
Now to retrieve a single item.
@app.get("/{id}")
def getItem(id:int, session: Session = Depends(get_session)):
    item = session.query(models.Item).get(id)
    return item
And to update an item.
@app.put("/{id}")
def updateItem(id:int, item:schemas.Item, session = Depends(get_session)):
    itemObject = session.query(models.Item).get(id)
    itemObject.task = item.task
    session.commit()
    return itemObject
Lastly, to delete an item.
@app.delete("/{id}")
def deleteItem(id:int, session = Depends(get_session)):
    itemObject = session.query(models.Item).get(id)
    session.delete(itemObject)
    session.commit()
    session.close()
    return 'Item was deleted'
OK, that’s it!
You can find the full code on GitHub or watch the stream recording here: https://www.youtube.com/watch?v=FOZNYBu8u18